6 Common Mistakes Gardeners Make in Spring
Are you making one of these mistakes in your growing area? Spring is coming, and we’re all ready to get into the garden. But before you go, review these common gardening mistakes and learn how you can avoid them.
This blog post shares a live video series from our Gardens That Matter Facebook page. You can watch the recordings here.

Mistake #1: Working When Soil is Too Wet
Spring rains are great for our gardens, but if it’s been raining recently where you live, you’ll want to wait to start gardening. Working in wet soil destroys soil structure.
Healthy soil is similar to a sponge. It’s full of open spaces where air and water can move easily. Water moves up and down with capillary action. Walking, digging, and tilling wet soil compacts these spaces.
How do you know? Feel your soil!
- When you squeeze a handful, does water drip or mud ooze out? Is your hand left a muddy mess? If so, your soil is too wet to work.
- Do your boots get caked with mud when you walk between the rows or along the edges? If so, your soil is too wet to work. Get out of there!
- If you can squeeze a handful without drips, the soil crumbles back apart after, and you can easily brush most of the remaining soil off your hand, you’re good to go.
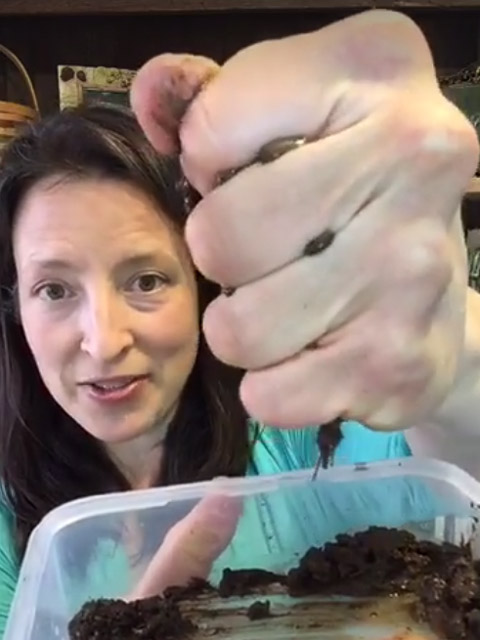
Can you see the mud oozing out of the sample I used in the video lesson? Definitely too wet to work!
Mistake #2: Too Much Enthusiasm
This mistake will force you to get creative OR make you want to pull your hair out.
Last year, I was so excited to get into the garden with our boys. I thought radishes would be a great first crop. Good for cool weather, fast to germinate, and a “quick win” for the kids to see. We planted LOTS of radishes…colorful Easter Eggs, bright red Cherry Belles, and elegant French Breakfast.
A few weeks later, the boys had a fantastic time harvesting…but I quickly realized that I’d gone overboard when I planted.
I worked hard to convince them to try the beautiful little radishes. We had dip, butter & radish sandwiches, and more. No go. “Too spicy!” they protested.
I ate a lot of radishes myself over that week or so last spring. 🙂 Good thing I like the butter & radish sandwich. (Seriously, you should try it!)
Has this ever happened to you? What veggie have you had coming out of your ears?
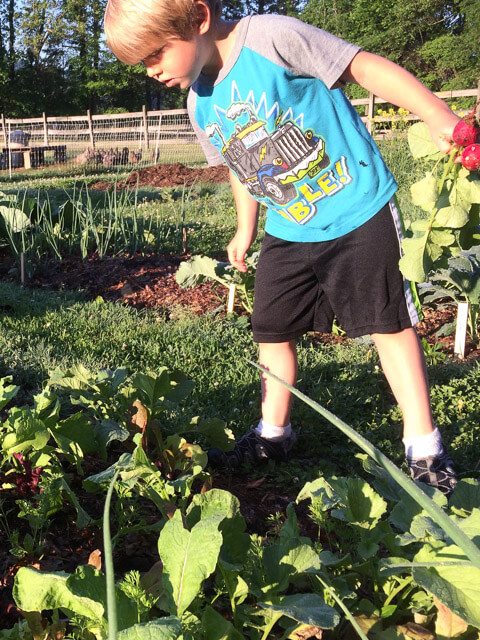
The boys had fun finding and pulling radishes. Now, who’s going to eat all of these beauties?
Avoid over-planting in your spring enthusiasm with these three tips:
- Start with foods you love <3. I probably could have projected the kids’ dislike of the spicy radishes. I would have been better off starting with a few for the early harvest fun, and then planting more carrots and spinach.
- Plant in succession. Summon up your will power and plant only a small area during your first planting day. Put the spring seeds in a convenient place and plant again a few days or a week later. Then, you’ll have abundance spread out so you can actually eat it all!
- Choose plants with a “long harvest window.” When radishes are ready, they’re ready. Leave them in the ground for long and they get stringy and bolt. In spring, think about plants you can cut and come again. Loose leave lettuces, chard, and kale are good examples of plants from which you can harvest outer leaves while the center continues growing. Again, you’re spreading the abundance across the season.
- Make a plan! On those rainy spring days, take time to sketch out your garden and plan what and how much you’ll plant. You can think through how summer crops can follow some of the (mostly) one-time spring crops, like broccoli and radishes.
If you’d like support in your planning, join our 7-Day Happy Garden Challenge. You’ll get daily email lessons, short action assignments, and more to help you get ready to plant.

Are you ready for spring? Join our 7-Day Happy Garden Challenge and create a plan for your garden.
When it’s time to plant, you’ll be ready to grow!
Mistake #3: Oops, I Forgot!
This mistake happens a few weeks after that initial burst of enthusiasm. You planted lots of seeds and visited often at first. But then, you got busy…life happened…and when you finally came back…disaster!
Maybe this has happened to you. You realize that your seedlings dried out or aphids have covered the plants or weeds have taken over. Yikes!
If so, you’re not alone. This has definitely happened to me, too. Now, let’s talk about ways to avoid the waning enthusiasm and unintentional garden neglect.
- Plan where you’ll see your garden. If you’re just starting out, you might put a small bed or a group of containers near your back door. Maybe you can make the trip to your car or your mailbox along a path that borders your garden. Figure out a way to see it often. You’ll be quick to notice that your plants need water and to spot any potential problems while they’re small.
- Set up a garden routine. Whether you’ve thought it out formally or not, you probably have a general daily and weekly routine. How can you fit gardening into it? I know some people visit the garden each morning to see what they can include in their dinner that night. We usually head to the garden in the afternoons when our boys get home from preschool. Maybe you make gardening part of each weekend. Try to visit at least once a week right now, knowing that you’ll need to stop by more often when the fruits and veggies get ripe.
- Put gardening on your calendar. In your paper or digital calendar, add gardening routines, tasks, and projected harvest dates to it. As one of my mentors says, “If it’s not scheduled, it’s not real!” You’ll see the garden reminders when you’re checking the calendar for your work and family obligations. It’s a “hack” I’m going to use even more this year by adding harvest windows and meal plan ideas based on when I plant my seeds.
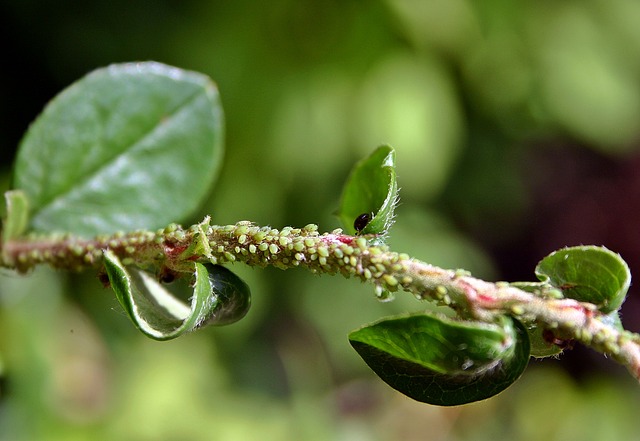
Aphids seem to appear out of nowhere! Checking your garden regularly allows you to see them (and other pests) early and figure out how to manage them.
Mistake #4: Soil “Blindness”
If you’ve ever applied amendments like salt and pepper, without knowing what nutrient levels are already in your soil, you’ve had what I call “soil blindness.”
If you’ve ever planted in the mysterious soil around your home and crossed your fingers, you’ve made this mistake, too.
“Seeing” your soil and understanding its health will help you have a successful garden in the long-term. Our soil is an entire world of its own, and while we can’t see everything going on there, we can get snapshots of its condition.
One of the simplest ways to get a snapshot of your soil is to do a soil test.
- Find a soil test service from your local extension service or a commercial soil test lab.
- Collect a composite sample by taking small samples from 10+ spots in your growing area. (More details about this in this afternoon’s video!)
- Use your results to guide your choice of amendments and plans for soil care.
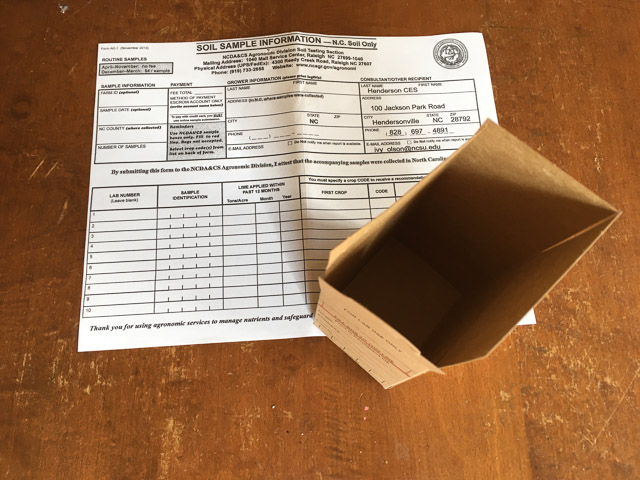
Ready to fill with a soil sample and send off to the NCSU lab.
Mistakes #5 and 6: Coming Soon (No Spoilers!)
I’ll be adding these here after tonight’s live broadcast. Join us at 9pm EST on Facebook to chat about spring gardening and ask your questions.
Do any of these mistakes sound familiar to you?
I’d love for you to share your experience in the comments. Perhaps, you can help us all avoid a similar challenge in our own gardens. 🙂